How to Add Screen Record on iPhone
If you’ve ever wanted to capture your iPhone screen to share gameplay, create tutorials, or save important moments, you’re in the right place. Screen recording on an iPhone is a built-in feature that allows you to quickly and easily record whatever is happening on your screen. In this post, we will guide you through the steps to enable the screen recording feature in your Control Center, making it simple to start recording with just a few taps.
Video Tutorial
Why You Might Be Looking for This Tutorial
Many iPhone users are eager to learn how to screen record for several reasons:
- Sharing Gameplay: Mobile gaming has skyrocketed in popularity, and many gamers want to showcase their skills or share gameplay moments with friends or followers.
- Creating Tutorials: If you’re a content creator, capturing your screen can be an essential tool for making how-to videos, allowing you to demonstrate functions or features live.
- Saving Important Moments: Whether it’s capturing a video call or an important presentation, screen recording allows you to preserve moments that matter without the complications of third-party apps.
Steps to Enable Screen Recording on iPhone
Follow these simple steps to add and use the screen recording feature on your iPhone:
- Open Settings: Locate the “Settings” app on your iPhone and tap to open it.
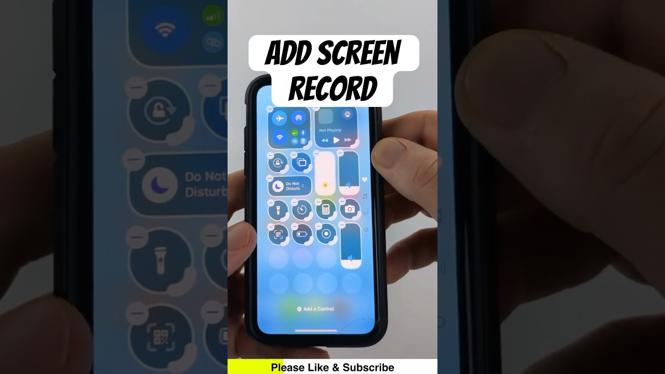
- Tap Control Center: Scroll down and find “Control Center.” Tap on it to access further options.
- Customize Controls: In the Control Center settings, select “Customize Controls.” Here, you will see a list of options available to add to your Control Center.
- Add Screen Recording: Locate “Screen Recording” in the list of more controls, then tap the green plus sign (+) next to it. This action will add Screen Recording to your Control Center.
- Access Control Center: To start screen recording, swipe down from the top-right corner of your iPhone (or swipe up from the bottom on older models) to access the Control Center.
- Start Recording: Tap the Screen Recording icon (a solid dot within a circle). You will see a countdown from three, signaling that the recording will begin shortly.
- Stop Recording: To stop the recording, tap the red status bar at the top of your screen and confirm by tapping “Stop.” Alternatively, you can go back to the Control Center and tap the Screen Recording icon again.
Conclusion
Enabling screen recording on your iPhone is an effortless process that can greatly enhance your ability to share content, create tutorials, and save memorable moments. Now that you know how to set up this helpful feature, you can start capturing your screen in just a few taps. Happy recording!
More iPhone Tutorials:
 Subscribe Now! 🙂
Discover more from Gauging Gadgets
Subscribe to get the latest posts sent to your email.