Learn how to add subtitles to a YouTube Video. In this tutorial, I show you how to add captions in YouTube Studio (Beta) to your videos. This is a simple process and can make a big difference to any viewers with hearing disabilities.
Video Tutorial:
Note: this requires the use of YouTube Studio: https://studio.youtube.com
Follow the steps below to include captions or subtitles in your YouTube videos:
- Visit https://studio.youtube.com
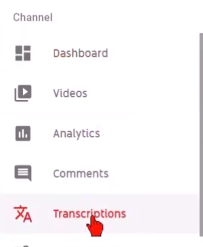
- Select Transcriptions in the left sidebar. This should load all of your uploaded videos.
- Find a video that you would like to add subtitles, and then select the small arrow under Languages for the video. Select the language used in the video by scrolling through the drop-down that appears. If you use the same language in all of your videos, I recommend checking Make this the default for my channel.
- Select Confirm.
- At this point, YouTube has already created captions for the video, all you need to do is go through the subtitles and correct any errors. To do this, select Publish (located on the same line as the language you selected). This will bring you to a page where you can see all of the subtitles and the time they were spoken in the video.
- Select Edit in the top left corner to correct any mistakes or make any changes.
- From here, you can fully edit the subtitles. Add, remove, or replace any wording, rearrange the order of the subtitles, as well as delete an entire section of subtitles all together. To save your changes, select Publish edits.
Please leave a comment below if you experience any issues while trying to add captions to your videos and I will do my best to help you.
More YouTube tutorials:
 Subscribe Now! 🙂
1
/
13
How To Download YouTube Videos In Laptop & PC - Easy Guide
How To Download Music From YouTube As MP3 File - Full Guide
How to Add YouTube Link to Instagram Bio
I Created a LINK IN BIO for YouTubers
How to Download Music from YouTube to MP3 - Easy Step By Step
How to Turn OFF Auto Dubbing on YouTube Mobile Videos - iPhone, Android, Samsung
How to Remove Your YouTube Account From TV
How to Bold Text on YouTube Comments - Mobile & PC
How to Download Music from YouTube on iPhone
How to Turn ON Autoplay on YouTube - iPhone, Android, & Samsung
How to Download Music from YouTube as MP3 File - iPhone & Android
How to Turn OFF Autoplay on YouTube - iPhone, Android, & Samsung
How to Hide YouTube Channel - Deactivate Your YouTube Channel
How to Hide YouTube Channel on Mobile - Deactivate Your YouTube Channel
How to Delete YouTube Channel Permanently on Mobile - iPhone & Android
1
/
13
Discover more from Gauging Gadgets
Subscribe to get the latest posts sent to your email.