How to Change Your Name on Facebook Desktop, Laptop, & PC
Changing your name on Facebook can help you ensure that your profile accurately reflects your identity or brand. Whether you want to use your full name, a nickname, or a pseudonym, updating your Facebook name is a straightforward process. This blog post will guide you through the steps to change your name on Facebook using a desktop, laptop, or PC, making it easy to personalize your online presence.
Video Tutorial
Why You Might Be Looking for This Tutorial
There are several reasons someone may want to change their name on Facebook:
- Personal Identity: You might want your Facebook name to reflect your current name or preferred way of identifying yourself.
- Branding: If you are a public figure or run a business, you may want your name to align with your brand.
- Privacy Concerns: Changing your name can help enhance your privacy on the platform.
- Life Changes: Events such as marriage, divorce, or religious conversion may prompt you to update your name.
Steps to Change Your Name on Facebook Using a Desktop, Laptop, or PC
- Log Into Your Account: Open your preferred web browser and go to Facebook.com. Enter your login credentials to access your account.
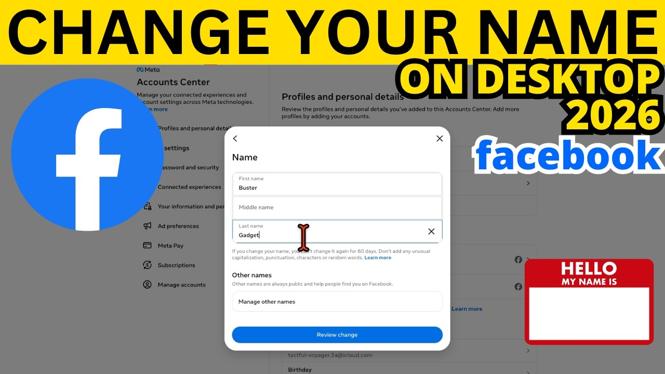
- Access Your Settings: Click on the down arrow in the top right corner of the Facebook page. From the dropdown menu, select “Settings & privacy,” then click on “Settings.”
- Navigate to Your Name Settings: In the left sidebar, click on “General.” You will see your account information, where you can manage names, contact options, and more.
- Edit Your Name: Click on the “Edit” button next to your name. Enter your desired first and last name in the provided fields. Make sure to follow Facebook’s name standards for this step.
- Review Your Changes: After entering your new name, review it to ensure it accurately reflects how you want to be seen on Facebook.
- Save Changes: Once you are satisfied with the name change, click “Review Change.” You may need to enter your password to confirm the change, which ensures your account’s security.
- Check Your Profile: After saving the changes, visit your profile to ensure that your new name is displayed correctly.
Remember, Facebook has guidelines regarding name changes, and frequent changes can lead to restrictions. Always ensure the name you choose aligns with your identity and Facebook’s policy to avoid complications.
With this simple tutorial, you can easily personalize your Facebook account by changing your name using your computer. For more detailed guidance, refer to the video tutorial above.
More Facebook Tips & Tutorials:
 Subscribe Now! 🙂
Discover more from Gauging Gadgets
Subscribe to get the latest posts sent to your email.