How to Change Date and Time on Samsung Phone
Accurate timekeeping on your Samsung phone is essential for scheduling appointments, receiving timely notifications, and using various time-sensitive applications. Whether you’ve just moved to a new time zone, are experiencing incorrect time settings, or simply want to customize the way your device displays time and date, knowing how to change these settings on your Samsung phone can greatly enhance your user experience. In this tutorial, we will walk you through the steps to manually set the date and time, enable automatic time zone updates, and troubleshoot any clock-related issues on your Samsung Galaxy device.
Video Tutorial
Why You Might Be Looking for This Tutorial
Many users find themselves needing to change the date and time settings on their Samsung phones due to various reasons, including:
- Traveling to a different time zone and wanting to adjust the time automatically.
- Experiencing discrepancies in the clock settings after a software update.
- Desiring a manual override for specific needs, such as adjusting for Daylight Saving Time.
- Correcting the time after resetting the device or replacing the SIM card.
Steps to Change Date and Time on Samsung Phone
Step 1: Open the Settings App
Begin by finding the Settings app on your Samsung device. You can locate it in your app drawer or by swiping down the notification shade and tapping the gear icon.
Step 2: Navigate to Date and Time Settings
Within Settings, scroll down and tap on “General management.” From there, select “Date and time.”
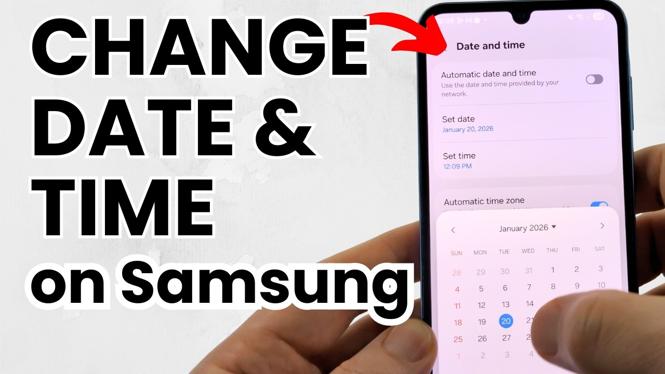
Step 3: Enable Automatic Date and Time
If you want your phone to automatically adjust the date and time, toggle the “Automatic date and time” option ON. This will use your network provider’s information to set your clock accurately.
Step 4: Set Date and Time Manually
If you prefer to set the date and time manually, turn off the “Automatic date and time” option. You will then be able to manually enter your desired date and time by tapping on “Set date” and “Set time.”
Step 5: Adjust Time Zone Settings
To ensure your phone displays the correct time zone, tap on “Select time zone” and choose your current location. Enabling “Automatic time zone” will allow your phone to update the time zone based on your location automatically.
Step 6: Sync with the Internet (Optional)
If you are facing repeated issues with incorrect time, you can try syncing your clock with an internet time server. To do this, ensure “Automatic date and time” is enabled, as your device will connect to your network to maintain accuracy.
Step 7: Troubleshooting Incorrect Clock Settings
If you still experience issues with the date and time settings, consider restarting your device or checking for any software updates in the Settings app. Keeping your phone updated can help resolve various software-related problems.
Following these steps will ensure that your Samsung phone displays the correct date and time, enhancing your overall experience and keeping you organized. For a visual guide, refer to the above video tutorial, which provides a comprehensive walk-through of the entire process.
More Samsung Phone Tips & Tutorials:
 Subscribe Now! 🙂
Discover more from Gauging Gadgets
Subscribe to get the latest posts sent to your email.