Want to learn how to navigate on your Garmin Forerunner 245? In this tutorial, I show you how to setup and use navigation on the Garmin Forerunner 245. Navigating on the Garmin Forerunner 245 is easy and very useful. Not only do I show you how to navigate on the Garmin Forerunner 245, but also how to create and edit saved locations on the Garmin Forerunner 245. Don’t have yours yet? No worries!
Order One Today 👇
Garmin Forerunner 245 Music: https://geni.us/Garmin245M
Garmin Forerunner 245: https:/geni.us/Garmin245
Useful Accessories 👇
Garmin Forerunner 245 Extra Charging Cable: https://geni.us/245Cable
Garmin Forerunner 245 Screen Protector: https://geni.us/245Screen
Garmin Forerunner 245 Port Protector: https://geni.us/245Por
Garmin Forerunner 245 Replacement Watch Band: https://geni.us/245WatchBand
The navigation features on the Garmin Forerunner 245 are very impressive. These features include: save location via GPS, a live course map that allows pan and zoom, and the ability to quickly Tracback if you get lost.
Video Tutorial:
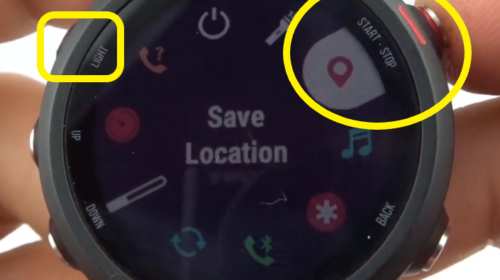
How to save a location on the Garmin Forerunner 245:
- Hold down the Light button to open the control menu.
- Select the red map pin icon. If you don’t have this icon, you can add it by going back to the control menu options. You should see Wait for GPS while it processes your location.

- Once the GPS has finished, you should see your GPS coordinates. Select the start button to save the location.
- Edit the Name and Icon under Edit.
How to setup and use navigation on the Garmin Forerunner 245:
- To begin navigating, select an activity from the activity list and select Start.
- Once the activity opens, press the up button to open the options.
- In the options, scroll and select Navigation.
- In Navigation, you can select Back to Start, Courses, Activities, and Save Locations.
More Garmin Forerunner 245 Tutorials:
Discover more from Gauging Gadgets
Subscribe to get the latest posts sent to your email.


 Subscribe Now! 🙂

